JSON数据交互和RESTful的支持
大纲
- 了解JSON的数据结构
- 掌握基于SpringMVC中JSON数据的交互
- 熟悉RESTful风格的请求样式
- 掌握Spring MVC中RESTful风格请求的使用
JSON
这里可以看之前写的文章
SpringMVC中JSON数据交换
说明&依赖
在Spring中,提供了一个HttpMessageConverter<T>接口来完成此项工作,该接口主要是用于将请求信息中的数据转换为一个泛型对象,并将这个泛型对象绑定到请求方法的参数中,或者将对象转换为响应信息传递给浏览器显示
Spring为这个接口提供了很多实现类,这些实现类可以对不同类型的数据进行信息转换,其中MappingJackson2HttpMessageConverter是Spring MVC默认处理JSON格式请求响应的实现类,该实现类利用了Jackson开源包读写JSON数据,可以将Java对象转换为JSON对象和XML文档,同时也可以将JSON或者XML文档转换为Java对象
我们在pom.xml中添加如下依赖并且import一下
在本文发表时,Jackson2.9.8为最新稳定版本!
 <!-- 引入Jackson -->
    <dependency>
      <groupId>com.fasterxml.jackson.core</groupId>
      <artifactId>jackson-databind</artifactId>
      <version>2.9.8</version>
      <type>bundle</type>
    </dependency>
    <dependency>
      <groupId>com.fasterxml.jackson.core</groupId>
      <artifactId>jackson-core</artifactId>
      <version>2.9.8</version>
      <type>bundle</type>
    </dependency>
    <dependency>
      <groupId>com.fasterxml.jackson.core</groupId>
      <artifactId>jackson-annotations</artifactId>
      <version>2.9.8</version>
      <type>bundle</type>
    </dependency>
注解说明
| 注解 | 说明 |
|---|---|
@RequestBody |
用于将请求体中的数据绑定到方法的形参中,改注解用在方法的形参上 |
@ResponseBody |
用于直接返回return对象,该注解用在方法上 |
配置文件的修改
web.xml
<display-name>Archetype Created Web Application</display-name>
  <!-- 工程编码过滤器 -->
  <filter>
    <filter-name>encodingFilter</filter-name>
    <filter-class>org.springframework.web.filter.CharacterEncodingFilter
    </filter-class>
    <init-param>
      <param-name>encoding</param-name>
      <param-value>UTF-8</param-value>
    </init-param>
    <init-param>
      <param-name>forceEncoding</param-name>
      <param-value>false</param-value>
    </init-param>
  </filter>
  <filter-mapping>
    <filter-name>encodingFilter</filter-name>
    <url-pattern>/*</url-pattern>
  </filter-mapping>

  <!-- log4j配置 -->
  <context-param>
    <param-name>log4jConfigLocation</param-name>
    <param-value>classpath:log4j.properties</param-value>
  </context-param>
  <listener>
    <listener-class>org.springframework.web.util.Log4jConfigListener
    </listener-class>
  </listener>
<!--配置springmvc DispatcherServlet-->
  <servlet>
    <servlet-name>springMVC</servlet-name>
    <servlet-class>org.springframework.web.servlet.DispatcherServlet</servlet-class>
    <init-param>
      <!--配置dispatcher.xml作为mvc的配置文件-->
      <param-name>contextConfigLocation</param-name>
      <param-value>classpath:dispatcher-servlet.xml</param-value>
    </init-param>
    <load-on-startup>1</load-on-startup>
    <async-supported>true</async-supported>
  </servlet>
  <!--为DispatcherServlet建立映射 -->

  <servlet-mapping>
    <servlet-name>springMVC</servlet-name>
    <url-pattern>/</url-pattern>
  </servlet-mapping>
  <!--把applicationContext.xml加入到配置文件中-->
  <context-param>
    <param-name>contextConfigLocation</param-name>
    <param-value>classpath:Spring-config.xml</param-value>
  </context-param>
  <listener>
    <listener-class>org.springframework.web.context.ContextLoaderListener</listener-class>
  </listener>
  <!-- 防止Spring内存溢出监听器 -->
  <listener>
    <listener-class>org.springframework.web.util.IntrospectorCleanupListener
    </listener-class>
  </listener>
dispatcher-servlet.xml
<?xml version="1.0" encoding="UTF-8"?>
<beans xmlns="http://www.springframework.org/schema/beans"
       xmlns:xsi="http://www.w3.org/2001/XMLSchema-instance"
       xmlns:context="http://www.springframework.org/schema/context"
       xmlns:mvc="http://www.springframework.org/schema/mvc"
       xsi:schemaLocation="http://www.springframework.org/schema/beans
       http://www.springframework.org/schema/beans/spring-beans.xsd
       http://www.springframework.org/schema/context
       http://www.springframework.org/schema/context/spring-context.xsd
       http://www.springframework.org/schema/mvc
       http://www.springframework.org/schema/mvc/spring-mvc.xsd">
    <!--此文件负责整个mvc中的配置-->

    <!--启用spring的一些annotation -->
    <context:annotation-config/>

    <!-- 配置注解驱动 可以将request参数与绑定到controller参数上 -->

    <mvc:annotation-driven conversion-service="conversionService"/>

    <!--静态资源映射-->
    <!--本项目把静态资源放在了webapp的statics目录下,资源映射如下-->
    <!--<mvc:resources mapping="/css/**" location="/WEB-INF/statics/css/"/>-->
    <!--<mvc:resources mapping="/js/**" location="/WEB-INF/statics/js/"/>-->
    <mvc:resources mapping="/img/**" location="/WEB-INF/static/img/"/>

    <!-- 对模型视图名称的解析,即在模型视图名称添加前后缀(如果最后一个还是表示文件夹,则最后的斜杠不要漏了) 使用JSP-->
    <!-- 默认的视图解析器 在上边的解析错误时使用 (默认使用html)- -->
    <bean id="defaultViewResolver" class="org.springframework.web.servlet.view.InternalResourceViewResolver">
        <property name="viewClass" value="org.springframework.web.servlet.view.JstlView"/>
        <property name="prefix" value="/WEB-INF/"/><!--设置JSP文件的目录位置-->
        <!--<property name="suffix" value=".jsp"/>-->
        <property name="order" value="0"/>
        <property name="exposeContextBeansAsAttributes" value="true"/>
    </bean>

    <!-- 自动扫描装配 -->
    <context:component-scan base-package="eendtech.controller"/>

    <bean id="conversionService" class="org.springframework.context.support.ConversionServiceFactoryBean">
        <property name="converters">
            <set>
                <bean class="eendtech.covert.DateConverter"/>
            </set>
        </property>
    </bean>

    <!--<bean id="formatterService" class="org.springframework.format.support.FormattingConversionServiceFactoryBean">-->
        <!--<property name="formatters">-->
            <!--<set>-->
                <!--<bean class="eendtech.Formatter.DateFormatter"/>-->
            <!--</set>-->
        <!--</property>-->
    <!--</bean>-->

</beans>
和前面的教程几乎一样,不用做什么修改,但值得注意的是,在这个配置文件中
<mvc:annotation-driven conversion-service="conversionService"/>
这个标签配置会自动注册RequestMappingHandlerMapping和RequestMappingHandlerAdapter两个Bean,这两个Bean提供了对读写XMLL和读写JSON等功能的支持
编写测试
编写代码之前请确保编译目录的lib下面有这三个包
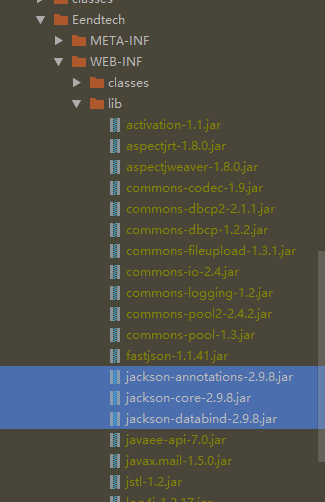
缺少任何一个包都不行,之前查了半天的错,最后发现是包Maven没有给我成功引进来,好了我们现在来开始编码工作
index.jsp
<%@ page contentType="text/html;charset=UTF-8" language="java" %>
<html>
<head>
<title>Title</title>
<script src="http://libs.baidu.com/jquery/1.11.3/jquery.min.js"></script>
<script type="text/javascript">
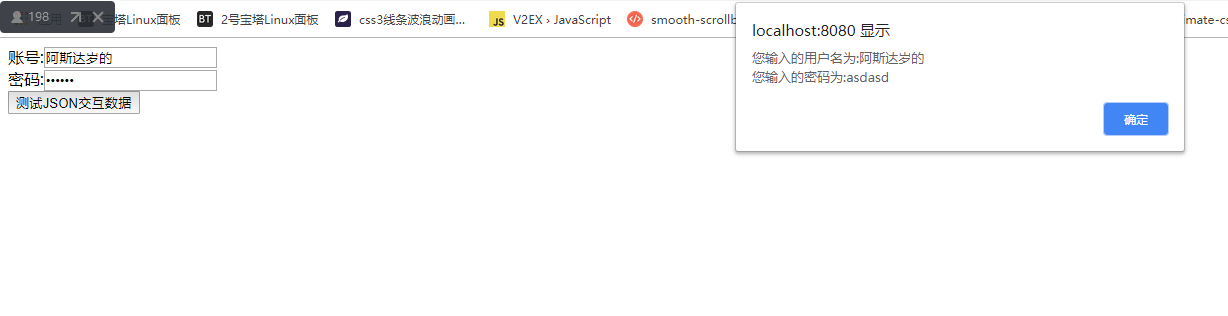
function testJson() {
//获取输入的用户名和密码
var userName = $("#userName").val();
var passWord = $("#passWord").val();
$.ajax({
url : "${pageContext.request.contextPath}/testJson",
type : "post",
data : JSON.stringify({userName:userName,passWord:passWord}),
contentType : "application/json;charset=utf-8",
dataType : "json",
success : function (data) {
if (data != null) {
alert("您输入的用户名为:"+data.userName+"\n您输入的密码为:"+data.passWord);
}
}
});
}
</script>
</head>
<body>
<form>
账号:<input type="text" required placeholder="请输入注册的账号" name="userName" id="userName"><br>
密码:<input type="password" required placeholder="请输入注册的密码" name="passWord" id="passWord"><br>
<input type="button" value="测试JSON交互数据" onclick="testJson()"/>
</form>
</body>
</html>
这里进行一下说明,我们需要用ajax进行请求,所以需要导入jQuery库,这里我使用的是百度的cdnLib,然后我们就可以进行愉快的编码了!
JsonController
@Controller
public class JSONController {
    @RequestMapping("/testJson")
    @ResponseBody
    public User testJson(@RequestBody User user){
        System.out.println("----获得请求-----");
        System.out.println(user);
        return user;
    }
}
这里有必要说明一下,关于注解我想再解释一下,同时你也可以回顾一下上文的注解说明,方法中的@ResponseBody注解用于将前端请求体中的JSON格式数据绑定到形参user上,@RequestBody注解用于直接返回User对象(当返回POJO对象时,会默认转换为JSON格式数据进行响应)
结果

关于AJAX
介绍
Ajax 即“Asynchronous Javascript And XML”(异步 JavaScript 和 XML),是指一种创建交互式网页应用的网页开发技术。
Ajax = 异步 JavaScript 和 XML 或者是 HTML(标准通用标记语言的子集)。
Ajax 是一种用于创建快速动态网页的技术。
Ajax 是一种在无需重新加载整个网页的情况下,能够更新部分网页的技术。
通过在后台与服务器进行少量数据交换,Ajax 可以使网页实现异步更新。这意味着可以在不重新加载整个网页的情况下,对网页的某部分进行更新。
传统的网页(不使用 Ajax)如果需要更新内容,必须重载整个网页页面。
——引用自百度百科词条
Jquery中的ajax
在Jquery中提供API接口给开发者进行AJAX操作,上文就有详细的例子,当点击按钮的时候,会执行页面中我们提前写好的testJson()函数,在函数中我们使用了JQuery的AJAX操作将JSON格式的用户名和密码传递到"/testJson"结尾的请求中
在AJAX操作中,包含了三个重要的属性
- data:在请求时携带的数据,当使用JSON格式的时候,需要注意编写的规范
- contentType:当请求数据为JSON格式的时候,值必须为application/json,当然你也可以像上文一样在后面追加参数,入设置编码格式
;charset=utf-8 - dataType:当响应数据为JSON时,可以定义dataType属性,并且值必须是为json,当然你也可以省略不写,因为页面会自动识别响应的数据格式
关于PJAX
题外话
题外话,本博客主题使用的就是PJAX技术,由友人C开发的Handsome,无偿打个小广告,想要获得本站主题,请联系友人C作者购买,请支持正版,同为程序猿深知开发不易,且行且珍惜!
下面放出购买链接
介绍
在GitHub中Pjax的介绍页上面写着
pjax = pushState + ajax
pjax is a jQuery plugin that uses ajax and pushState to deliver a fast browsing experience with real permalinks, page titles, and a working back button.
表明了Pjax只是Jquery的一个插件,他使用了ajax和pushState技术,来保持在使用AJAX重载页面的时候浏览器地址栏也能够同时发生变化,来达到可以使用后退按钮的效果
如何安装
如果你会使用npm仓库
$ npm install jquery-pjax
或者是直接引入但注意:你的jQuery版本必须高于1.8
下面放出Pjax引入的cdn中文镜像地址
引入实例
<script src="https://cdn.bootcss.com/jquery.pjax/2.0.1/jquery.pjax.js"></script>
如何使用
关于使用我就不做过多的说明了,因为我感觉我已经逐渐的偏题了,emmmm,好吧下面放出GitHub的地址
如果你的英文不太好的话,那么推荐你去下面这个地址查看中文文档
本文版权归属:极束の梦想
转载文章时,请保留本文的版权内容。
作者:Seale
同时也欢迎各位大大交换友链。

2 comments
大佬教我学 Java 哈~